RCTab v1.3.2 Section 22 - Installation Instructions for Windows OS v.1.3.0
RCTab v1.3.2 Section 22 - Installation Instructions for Windows OS v.1.3.0 document is solely for use in the State of California. This document can be expanded or updated as is necessary or required. Where relevant, this document refers to specific sections and requirements of the California Voting System Standards. Any recommendations listed in this document should not supersede user jurisdiction procedures or other controlling governance entities.
Installing RCTab v1.3.2
-
Never connect the internet to the Workstation RCTab is installed on.
-
Only Election Administrators should complete the following installation steps. It requires logging in with a Windows administrator level account created in RCTab v1.3.2 Section 16 - System Hardening Procedures - Windows OS v.1.3.0. As described in that section, credentials for the Windows Administrator account should follow secure password practices and should be provided to the least amount of users necessary to complete the following steps. Users who will be running the tabulation shall not have access to the Administrator account.
-
Log in to an administrator-level account on the RCTab machine.
-
Follow RCTab v1.3.2 Section 16 - System Hardening Procedures - Windows OS v.1.3.0 before installation of RCTab.
-
Create RCTab Windows Standard User Account To ensure that RCTab users have the least OS-level permissions necessary to run a tabulation we will create an ‘RCTab’ Windows standard user account. The standard user account has less permissions than a Windows administrator account. Jurisdictions shall use this standard ‘RCTab’ account when running tabulations with RCTab.
-
Open Windows System Settings by clicking the Windows Button -> Settings
-
Select ‘Accounts’
-
Click ‘Family & other users’ in the left menu list
-
Click ‘Add someone else to this PC’
-
Click ‘I don’t have this person’s sign in information’
-
Click ‘Add a user without a Microsoft Account’
-
Enter ‘RCTab’ as the User name
-
Enter a secure password
-
Enter security questions
-
Hit Next
-
The ‘RCTab’ account has been created. Continue installation instructions as an administrator-level account until installation instructions say to log in as RCTab user
-
-
Contact the relevant authority to request the Trusted Build of the RCTab v1.3.2 software.
-
The relevant authority will provide the procedures to receive the Trusted Build to install RCTab.
-
Upon receipt of RCTab, plug the flash drive RCTab is saved on into the USB port on the hardware to be used for RCTab installation.
-
Using File Explorer, locate the C:\ drive and open it.
-
Right-click in the open space in the right-hand frame and select new and left-click on the folder.
-
Name the new folder RCTab. This folder is now located at C:\RCTab
-
Using File Explorer, locate the rctab_v1.3.2_windows.zip file.
-
Right-click on the .zip file and select copy.
-
Using File Explorer, open the RCTab folder.
-
Right-click in the open space and select paste.
-
To validate that the downloaded zip folder contains the certified version of RCTab, follow the instructions in document RCTab v.1.3.1 Section 23 - Trusted Build & Output Hash Verification - Windows OS v.1.2.2
-
After validating the hash of the trusted build navigate to the RCTab folder and locate the rctab_v1.3.2_windows.zip file.
-
Right-click on the file. Then click on the tab “Compressed Folder Tools” at the top of the file explorer window. Click on “Extract All” at the top of the File Explorer.
-
A window will pop up. Confirm that the extraction location is the RCTab folder created earlier. Click extract.
-
The .zip file will now extract. You now have a folder called rctab_v1.3.2_windows
-
Enforce Read-Only Permissions on Output folder To enforce read-only permissions for all RCTab output you must set the following permissions on the folder your jurisdiction will use for RCTab output.
-
Create a folder to be used for RCTab output. In order for RCTab to write output files as read only do not use paths within the Windows User folders, like Desktop or Documents (that is anything under the path C:\users\. This requirement is programmed into RCTab - it will not allow the output path to be configured to a Windows user account folder. For these instructions we will create an output folder in the C:\RCTab folder we created earlier
-
Right click the C:\RCTab\output folder and select Properties
-
Click the ‘Security’ tab
-
Click ‘Edit’ to change permissions
-
Click ‘Add’
-
Type ‘RCTab’ in the “Enter the object names to select” text box
-
Click the ‘Check Names’ button. If successful, the user name will be underlined. It might include the computer name in front of it. This is ok as long as it is underlined.
-
Click ‘Ok’
-
Uncheck ‘Allow’ for ‘Read and Execute’
-
Check ‘Deny’ for ‘Write’
-
Click ‘Apply’
-
Click ‘Ok’
-
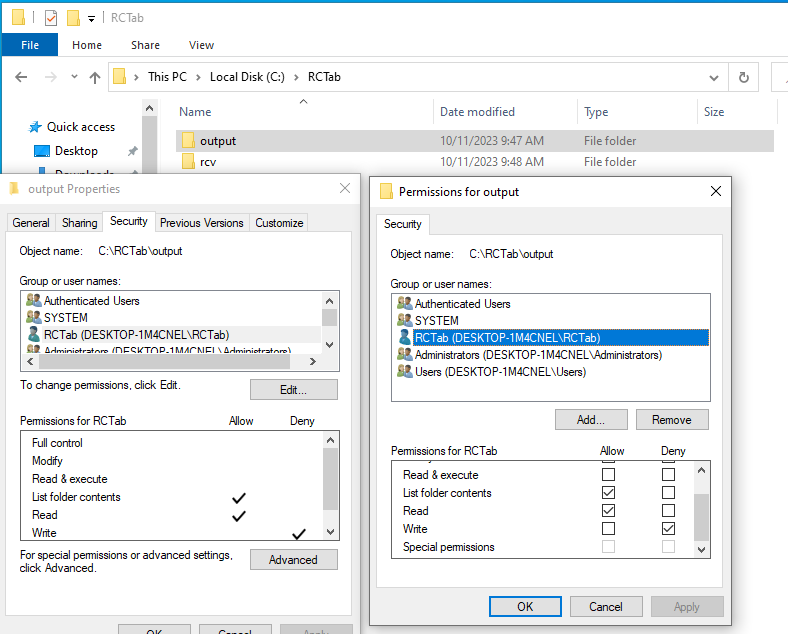
Note: RCTab contest summary output files are programmatically set to be unmodifiable. However, if the folder they are exported to is not set properly with the preceding steps users could delete them.
-
Now, log in as the ‘RCTab’ Windows standard user. Tabulation should always be done logged in to the Windows OS as the ‘RCTab’ Windows standard user.
-
Navigate to the rctab_v1.3.2_windows folder. Double click on the rcv folder.
-
Double click on the bin folder.
-
Right-click on the rcv.bat file Click ‘Run as Administrator.’ If a ‘Windows protected your PC’ window pops up click ‘More Info’ then click the ‘Run anyway’ button. Enter the administrator password
-
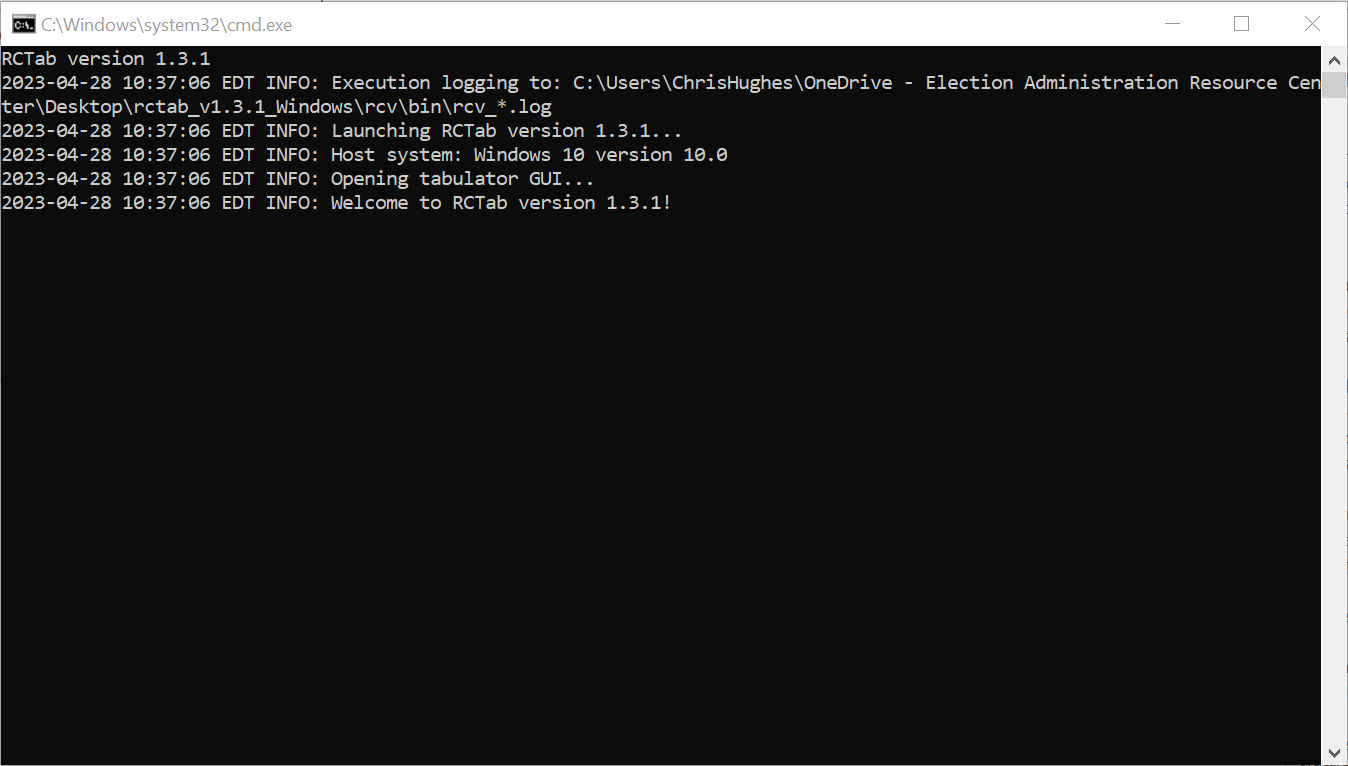
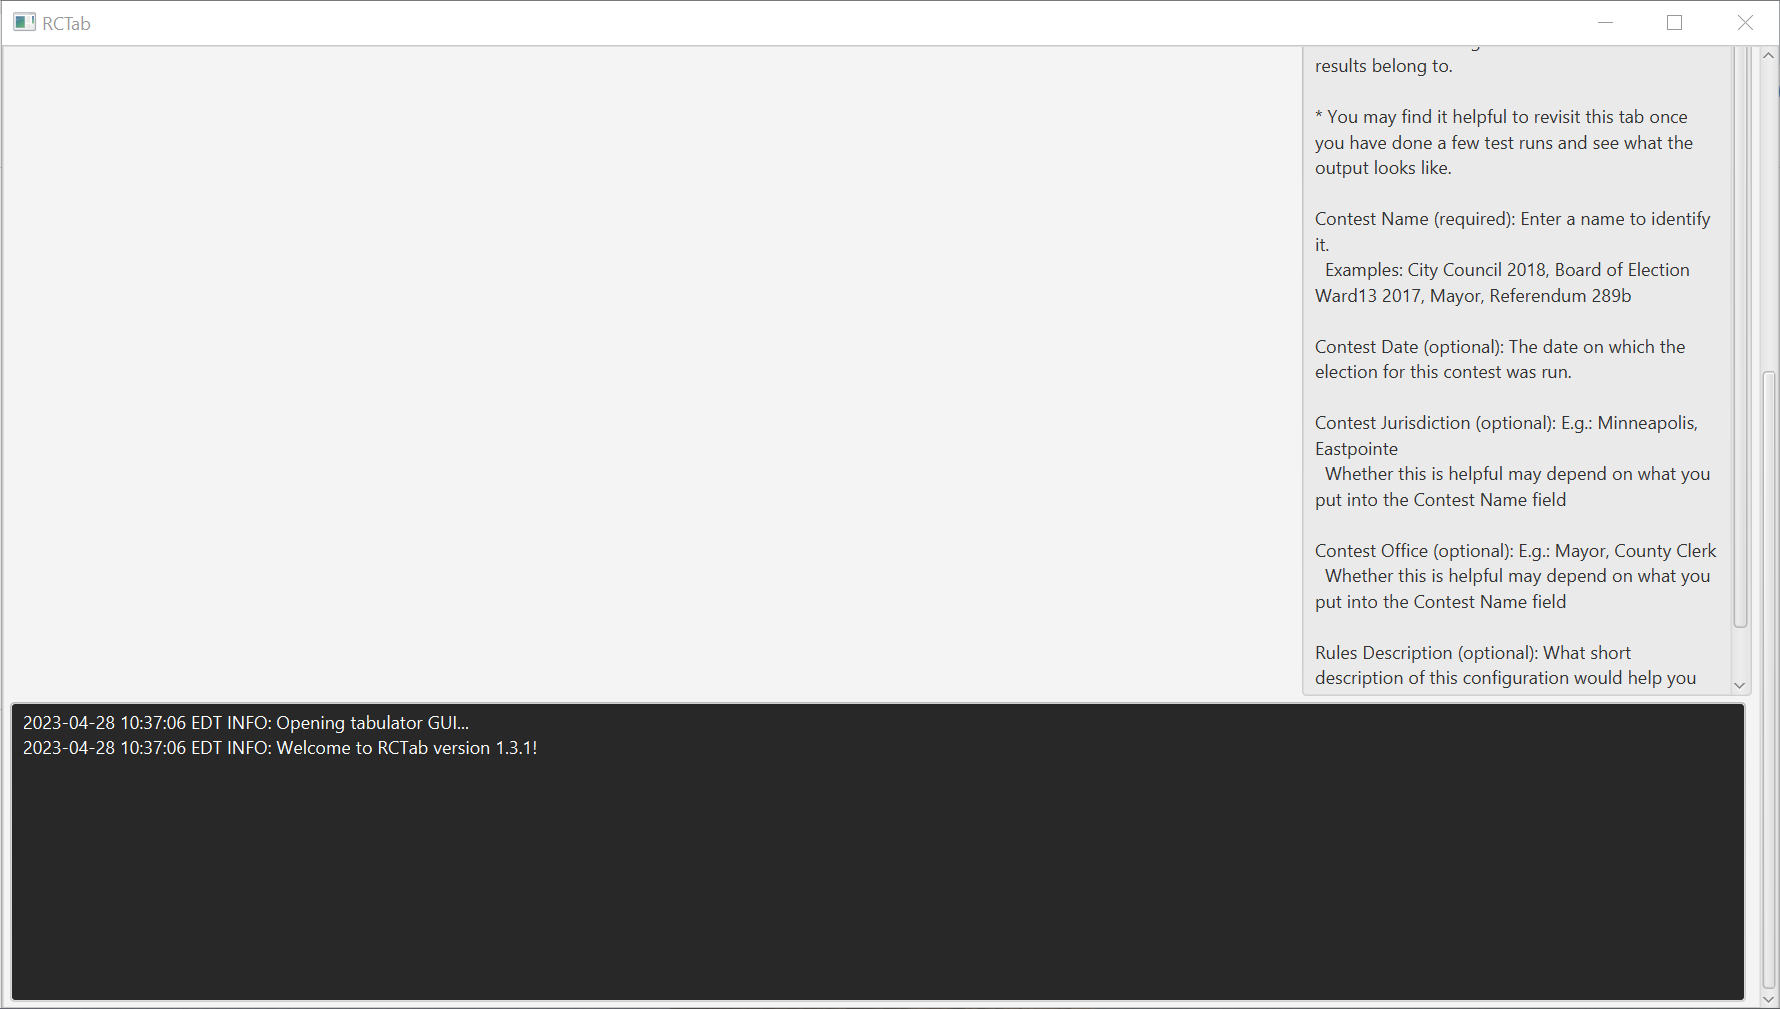
RCTab will now launch.
-
Using your mouse left click and drag the window with the dark top border down until it looks like the pictures below.
-
Check that the first line on the black background shows:
RCTab version 1.3.2
-
You have successfully installed the RCTab v1.3.2!
-
Optionally, you can create a shortcut on your desktop for a more simpler start process in the future
-
Right click the rcv.bat file -> Create Shortcut
-
Right click the shortcut file created -> Properties -> Advanced -> Check the ‘Run as administrator’ checkbox -> Ok -> Ok
-
Drag the shortcut file to your desktop
-
-
Complete the instructions in RCTab v.1.3.1 Section 23 - Trusted Build & Output Hash Verification - Windows OS v.1.2.2 under the ‘Validating the hash of a trusted RCTab build’ header to verify your installation.
| Document Revision History | |||
|---|---|---|---|
| Date | Version | Description | Author |
| 9/26/2023 | 1.3.0 |
|
Mathew Ruberg |
| 04/28/2023 | 1.2.1 | Updated for RCTab v1.3.1 | Melissa Hall |
| 04/04/2023 | 1.2.0 | Updated to Reflect RCTab v.1.3.0 | Rene Rojas |
| 01/19/2022 | 1.1.0 | Revisions for clarity | Ryan Kirby |
| 04/25/2021 | 1.0.0 | Installation Instructions for RCTab - Windows OS | Chris Hughes |
RCTab v.1.3.1 Section 23 - Trusted Build & Output Hash Verification - Windows OS v.1.2.2
RCTab v.1.3.1 Section 23 - Trusted Build & Output Hash Verification - Windows OS v.1.2.2 document is solely for use in the State of California. This document can be expanded or updated as is necessary or required. Where relevant, this document refers to specific sections and requirements of the California Voting System Standards. Any recommendations listed in this document should not supersede user jurisdiction procedures or other controlling governance entities.
Validating the hash of a trusted RCTab build .zip
To validate that the provided zip folder contains the certified version of RCTab v1.3.2, follow these instructions:
-
Open the Start Menu
-
Type in Command Prompt
-
Press enter to launch the Command Prompt
-
Type in C:\Windows\System32\certutil.exe -hashfile [filename]
-
To insert the file name: locate the rctab_v1.3.2_windows.zip in File Explorer
-
Left click on the file and while continuing to hold the mouse down, drag the file to the Command Prompt window and place after -hashfile.
-
Example: C:\Windows\System32\certutil.exe -hashfile C:\RCTab\rctab_v1.3.2_windows.zip
-
-
Add SHA512 to the end of the line
- Example: C:\Windows\Systems32\certutil.exe -hashfile c:\RCTab\rctab_v1.3.2_windows.zip SHA512
-
Press enter. The command prompt will show the text of the hash in the following format SHA512 hash of [filePath]: [SHA512 hash text]
-
Compare the SHA512 hash code produced on your system to the SHA512 hash code supplied with the trusted build.
-
If the SHA512 hash codes match 100%, you are using an approved download and can proceed. Return to the RCTab v1.3.2 Section 22 - Installation Instructions for Windows OS v.1.3.0 document to complete installation.
Validating the hash of RCTab contest summary files
RCTab automatically creates corresponding .hash files for the summary.csv and summary.json output files. Follow these instructions for using the [fileName].hash files to verify their corresponding summary file. For this example we will verify a summary.csv file and we will assume that it is located in c:\RCTab\output\
-
Create a new empty text file. We’ll call this the ‘comparison text file’
-
Copy the RCTab programmatically generated hash to the comparison text file
-
Open summary.csv.hash in text editor. This file contains the following format: [hash] [hashAlgorithm]
-
[hash] is the text of the hash itself
-
[hashAlgorithm] is the algorithm used to get the hash e..g SHA512
-
-
Copy the [hash] to the comparison text file on a single line
-
-
Use cmd prompt to generate hash of summary.csv
-
Open the Start Menu
-
Type in Command Prompt
-
Press enter to launch the Command Prompt
-
Create the command to hash the summary.csv with the following template C:\Windows\System32\certutil.exe -hashfile [filePath] SHA512
- Replace [filePath] with the location of your summary.csv. You can drag the file into the cmd prompt window to have it automatically fill it in for you or you can type it manually if you know the path
-
Press enter. The command prompt will show the text of the hash in the following format SHA512 hash of [filePath]: [SHA512 hash text]
-
-
Copy and paste [SHA512 hash text] to the next line of the comparison text file
-
Compare the text of the two SHA512 hashes. Pulling the width of the text editor wide enough so that the hashes each are one line each will help line them up for comparison.
| Document Revision History | |||
|---|---|---|---|
| Date | Version | Description | Author |
| 09/26/2023 | 1.2.2 | Use .hash files for output summary file verification. Use different example path that doesn’t use user folders | Mathew Ruberg |
| 04/28/2023 | 1.2.1 | Updated to reflect RCTab v1.3.1 | Kelly Sechrist |
| 04/04/2023 | 1.2.0 | Updated to Reflect RCTab v.1.3.0 | Rene Rojas |
| 01/20/2022 | 1.1.0 | Updated URCVT to RCTab and removed NY from the document. | Rene Rojas |
| 04/26/2021 | 1.0.0 | HashCode Instructions - Windows OS | Chris Hughes |